Operation Martlet: The Punch from Wünsche (Table 3.5, Turn 6)
As the sun begins to come up on the 26th, the watches swap out as Lt Muir rouses the rest of his men from their restless sleep. They’ve pushed the Germans out of their main defensive position and a gap between the SS and their neighboring unit, Panzer Lehr, has opened to five kilometers. The time is now to exploit this gap and press the retreating panzergrenadiers.
Unbenownst to the Scots Fusiliers, Obersturmbannfuhrer Max Wünsche, commander of the SS division’s panzer regiment, has been ordered to counterattack the pressing Brits. Elements of his attack have been given the main crossroad in Fonteney as their objective, with Muir’s platoon blocking their path.
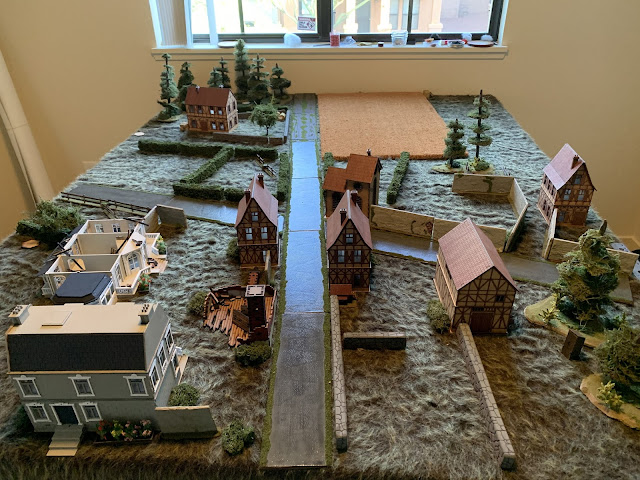
His platoon has done well to fortify their position. Despite the collapsed buildings from the previous night’s fighting, they’ve dug in well and wheeled in two 17-pounder anti-tank guns. Additionally, they’re supported by another Churchill AVRE.
 |
| The Scots’ defensive position, looking toward the German advance |
The German force sent to counterattack the crossroad consists of two Panzer V - Panthers, and two SdKfz 250/1s, each with a junior leader and a three man MG 42 team. They’ve been supported by an IeIG18 Infantry Gun to blast into the hard Norman buildings they’re up against.
As the counterattack probes forward, they push hard on the eastern flank, securing ground in the woods and the adjacent cabin. The defending Scots have set up within the buildings and ruins surrounding the crossroad and the shattered chateau.
 |
| The Scottish defensive position |
 |
| Counterattacking panzers’ JOPs |
Slowly, a Panther rumbles up the road, it’s main gun surveying the dense hedge land to their front. Immediately, a shell rattles their hull, ricocheting off the armor. The commander spots the 17-pounder AT gun entrenched by the church, and directs an HE shell toward them. The resulting blast kills one of the men crewing the AT gun.
 |
| The Panther rumbling up the dirt road |
 |
| Entrenched 17-pounder crew prepares to fire |
With their attention focused on the AT gun, the tank crew fails to notice a Churchill tucked behind a ruined house in town. A spigot mortar fired from the AVRE rocks the hull the Panther, violently shaking the men inside. The tank commander orders his machine to press hard right into the woods and behind the farmhouse - it's time to find a different approach forward.
 |
| The AVRE, watching the Panther peel off |
The Panther snakes behind the farmhouse, crushing hedge and hay as it reconnoiters a new path forward. The AVRE, having seen the German machine maneuver towards the east, moves to counter, pressing through the ruined chateau. Not realizing how far forward its opponent has pushed up, the Churchill slowly rumbles through the rubble into the road - right into the Panther's trap. The 88mm shell tears into the Churchill's thick armor, knocking it out. The crew bail and retreat to safety.
 |
| The Panther pressing with speed behind the farmhouse... |
 |
| ...to catch the AVRE as it clears the ruins |
One major threat knocked out, a second Panther moves up the road, sheltering a SdKfz 250 from the 17-pounder still to their front. The AT gun fires again, once more bouncing their shell off the tank's side. With the Panther between the half track and the 17-pounder, the half track speeds into the woods, followed closely by the tank. They snake behind the farmhouse and through the ruined hedge, following the tracks of the leading Panther.
 |
| The half track and Panther (that looks curiously like a Panzer IV) |
In order to counter this threat, the 17 pounder wheels out of its entrenchment and moves for the crossroad, where it can cover all roads, at least somewhat effectively. While the men are wheeling their AT gun into its new position, the final and as of yet uncommitted SdKfz 250 pushes hard to the west and into the wheat field. Sgt MacKay, from his position sees this threat to their flank and runs up to the 17 pounder, ordering them to wheel about and fire. The confusion mixed with the flat out speed of the half track causes the shot to go wide, and the German recon team disappears behind a hedge to the west.
MacKay orders the AT gun to fall back behind the crossroad, and to overwatch the west flank, waiting for the half track to attempt its crossing. Having prepared the defenses, MacKay drops back into one of the houses, from which he can orchestrate the immediate defense.
 |
| The 17 pounder's "cover-all" position |
 |
| The SdKfz 250 (222 proxy) pushing to the west |
Back on the eastern flank, two Panthers and a half track prepare to push into the dense part of town. With the MG42 of a half track and the 88mm canon on one Panther scanning the front, the lead Panther creeps into the road. The ground shakes as a second 17 pounder, nestled in the ground floor of a cafe down the road, opens on the exposed Panther. The round punches through its side armor, stopping it dead in its tracks.
The half track, being much lower to the ground and using the knocked out Panther as cover, attempts a road crossing to clamp down on a suspected Scottish position. Just as they cross the road, a PIAT team laying in wait in the grass fire their round into the 250's rear. The round destroys the thinly armored machine, killing two of the men within. A heavily dazed scharfuhrer and a machine gunner stumble out, seeking cover near the shattered chateau.
The PIAT team falls back towards their headquarters, with Lt Muir ordering them into another ambush position. The remaining bailed SdKfz 250 crew crosses the low stone wall to get out of the road - and right into the waiting guns of Cpl Bailey's section. The Bren and Lee Enfields light up the two SS, killing both in the open ground.
 |
| The PIAT's ambush of the SdKfz 250 |
A German infantry gun deploys on the east flank, using the destroyed Panther as cover. They fire high explosive rounds into the cafe, but only succeed in suppressing the 17 pounder. The AT gun fires back, having loaded in HE - two of the five German gun crew are killed.
To the west, the remaining half track speeds down an alleyway, intent on crossing the road as fast as it can. Once crossed it'll be able to apply pressure in the British rear, splitting their attention to two opposite directions.
 |
| The infantry gun trading fire with the 17 pounder - and losing |
 |
| The SdKfz 250 picks up speed for its daring road crossing |
The half track manages to speed across the road unscathed, the 17 pounder watching that side still unable to hit the small, fast moving scout half track. Using the pressure on the west flank, the Panther commander on the east side decides to apply pressure of his own. He plans to press towards the road while the infantry gun suppresses the 17-pounder. Once in the road, with the help of the infantry gun, his plan is to knock out the AT gun or its crew. Unfortunately, as he commences his plan and orders his driver through the hedge, the tracks tangle in the undergrowth and the behemoth grinds to a halt.
 |
| The Panther caught in the hedge |
The remaining piece of mobile German armor, the half track, decides to cut across the British rear, hoping to wreak havoc on the Scots with their anti tank weapons committed forward. Unfortunately for them, they failed to account for the PIAT waiting where Lt Muir placed them - tucked away near the barn to hold that flank. Once again, the rear of a SdKfz 250 erupts in flame as a PIAT round connects. This time, however, only one man is killed, and the scharfuhrer and remaining two men bound from the burning wreck, their sites set on their objective - Sgt MacKay and his forward position in the farm house.
 |
| The PIAT team and their second ambush |
Realizing the danger imminent to his platoon sergeant, a Bren gunner attempts to stop the on-rushing German team. One German falls just as they reach the house, pressed up beside the windows. The remaining Germans post two grenades through the windows and huddle against the side of the house as the blast emanates out of the windows. Sgt MacKay, the 22 year old recently promoted NCO, lay dead amidst settling dust and debris.
 |
| The Bren rattles as the raiders reach McKay's position |
The Bren gunner continues his fire as the grenades explode, killing one more German. Riley and his section, hearing the commotion to their rear, spring from their positions and subdue the remaining German raider, the scharfuhrer, capturing him.
 |
| Cpl Riley's section captures the scharfuhrer |
With one Panther knocked out, the other permanently bogged down in the hedgerow, and both scout vehicles neutralized, Wünsche’s counterattack in this sector runs out of steam. Lt Muir’s platoon held the line, albeit at a high price - the life of Sgt Carson MacKay. With this final setback, in addition to the casualties taken this far, his platoon is pulled off the line - the attack from Fontenay towards Rauray Ridge to be continued by a platoon from the Duke of Wellington's Regiment.
The Scottish platoon commander leaves the line feeling rather sociable despite the loss of his trusted sergeant. His platoon has taken and held the main line of German resistance in the Fontenay region. The men are less pleased, Sgt McKay was well liked, but Muir's CO is proud of the progress made - despite the price.
One thing to note prior to closing out: this map was designed as an extension of Map 3 within the campaign. TheTacticalPainter (https://thetacticalpainter.blogspot.com/) makes a compelling point in his play through of the Gembloux Gap campaign that if a force is counterattacking a map, the map should be an extension of the one played to illustrate the defenders holding the captured position. In this case, the Brits hold the chateau and crossroads in Fonteney, which would mean the Germans would be pushing back into that ground from the southeast. In order to create the field, we kept one third of the original map (crossroads, chateau, etc) and used satellite imagery and period maps to recreate the ground south and east of the area. A lot of guesswork, but hopefully a relatively accurate representation!
A fun game between -A- and I, and an interesting exercise in an attack by armor with little infantry support. Without much infantry to probe the way forward, the armor consistently ran into ambushes in the tight terrain. The counterattack would've been more effective in open terrain, but this terrain was where the high command required it go in. From here, both -A- and I will draw new and final platoons for the rest of the campaign, and she'll commit them to the open terrain south of Fonteney! We'll see you then!
Caleb
Comments
Post a Comment